
Mar. 17 2026
Now that you have integrated your works into MetaMusic, now is the time to document your sound recordings.
If you’re not a songwriter or publisher, this might even be the starting point..
This is the part that requires a specific methodology to ensure nothing is overlooked and to document all mandatory or necessary information to maximize royalties for everyone and give all contributors the credit they deserve. This is especially important because it’s crucial to remember that a song with incomplete metadata is less likely to be suggested by algorithms, particularly now that streaming platforms are starting to display more contributors in the credits. This is especially true for all musicians, production teams, and technical crews. The good news is that by using MetaMusic, you can list ALL the credits and add them everywhere right away.
Who does What?
In MetaMusic, as elsewhere, the responsibility for a sound recording—and therefore for documenting it—lies with the producer, whether an individual producer or a company, regardless of its legal structure. This includes self-producers without a record label, as well as artist-producers licensed to a label. The good news is that, depending on your contractual situation or your record label’s practices, you can sometimes delegate this task by granting read-write access to your profile to your partners. This way, they can relieve you of this responsibility while still allowing you to maintain control of your account and the ability to approve the information.
A new sound recording can also be created by a performing artist or a director, in a studio for example, and then taken over by the producer for finalization..
The challenges related to documenting sound recordings
When it comes time to document the release of an album, single, or EP today, several challenges arise that MetaMusic aims to eliminate:
- The importance of documenting all credits, contributions, and details without omitting anything, keeping in mind that there are often delays between production and release.
- The importance of having all the information and contact details for all collaborators, including songwriters and publishers.
- Exchanging data and information simply and efficiently between producers, publishers, labels, directors, performers, and the technical team.
You may have noticed that we talk about the credits of an album when, in reality, we’re talking about the credits of all the songs on an album. This is why it’s important to document the details of EACH song individually, since it may appear on multiple releases (single, album, festival compilation, best-of, etc.)..
What information will I need?
- The title
- The duration
- The unique ISRC code of each sound recording
- The associated work
- Who is the maker?
- The name of the studio and the recording dates (only the year is necessary, but the more precise, the better)
- The names of the performers (headliners, backing musicians, and guests)
- The technical contributors (director/producer, sound engineer, mixer, etc.)
- The lyrics (which can be copied if they are in the associated work) and their language
- The different genres and tags
- The public funding awarded
Currently
Currently, the maker or artist-maker sends information about the songs and album production to their record label. There is no standardized model or procedure, and this task can be time-consuming for producers, labels, and other collaborators.
For some, it will be an Excel spreadsheet, and for others, a Word document to fill out or an email template to complete. Some record labels, for example, ask for the bare minimum for online posting and the declarations that are their responsibility. Others, on the other hand, request all the details: identifiers, detailed credits for the works, performer lineups, and production credits—sometimes more than the distributors themselves request. But this is more the exception than the rule, and rightly so. This is information that is sometimes difficult to gather in its entirety and is not yet considered mandatory or even strongly suggested.
These processes, which were valid until very recently, pose several problems when they generate incomplete metadata. The reality is that streaming platforms—as well as traditional media and management companies—now demand complete and detailed credits upon release, and this trend will only accelerate to include more details and unique identifiers. This makes advanced metadata management prior to release all the more crucial, and that’s where MetaMusic comes in to help!
With MetaMusic
The documentation of sound recordings is independent of the releases they will be associated with. A song that appears on a single, an album, and then a compilation will have the same credits, identifiers, and description; you only document it once. Therefore, you must document your creations by including the recording details, the associated work, the maker(s), the studio sessions, the contributors, the lyrics, the genres, the tags, etc.
GOOD TO KNOW: Documenting sound recordings in MetaMusic is done manually, but we have provided tools to re-use elements that repeat from one track to another in a few ways:
- If all the songs on an album have the same studio, performers, technical team, genres/tags, you only need to complete the information once and duplicate it as many times as necessary
- Lists of genres and tags can be reused and copied from one track to another
- When a work containing lyrics is associated with a sound recording, they can be copied directly and then you can edit them as needed
How to create and document a sound recording in MetaMusic
Before Getting Started
The key to speed and simplicity in MetaMusic is to have as many collaborators as possible involved in the documentation process beforehand. This way, your workflow will be smoother, and you won’t need your collaborators’ contact information or have to invite them to the various data entry stages. We recommend reading this article on mobilizing your collaborators and the different tools available to you for doing so.
1A – Create a new sound recording from scratch
In the left-hand menu, select Sound Recordings and click on New Sound Recording.
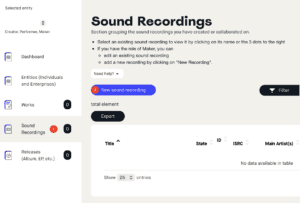
Add the title, then save to proceed to the next step. At this stage, if you are managing multiple stakeholders, pay attention to the role you are currently active with to ensure you are creating the correct stakeholder. If necessary, change the stakeholder using the dropdown menu in the upper left corner..
By saving, you will then arrive at the audio recording’s details page.
1B – Create a sound recording from an existing recording
To reuse certain already documented elements, you can create a new audio recording from an existing one in two ways. The new recording will have the same basic information: studios, performing artists, instruments, production credits and technical crew, genres, and tags.
First, make sure you select the correct individual from the top left menu and go to the Sound Recordings section.
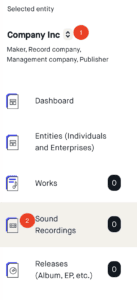
Then, you have 2 options:
- From your list of recordings, click on the icon
 on the far right of the sound recording that you To duplicate, select Duplicate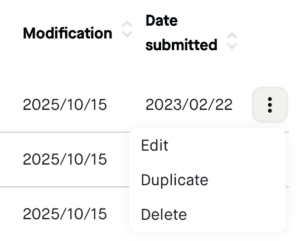
- Select a sound recording to view or edit its details. In the top right corner of its details, click the button

In both cases, you will have a window asking you to confirm the duplication.
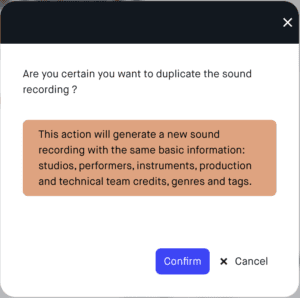
By selecting Confirm, you will be directed to the details of the new sound recording, which you can then finalize and modify with the specific elements of that sound recording in the following steps.
2 – Add or edit the details of the sound recording
Click on the  button to the right of the Details section to add these items:
- Title (You can modify it as needed.)
- ISRC
- Length: You can add it manually or copy the duration of the work after associating it. Click on it to copy the duration declared to SOCAN. However, be careful to use the final timing of the recording.
- Type of version: From the drop-down menu, select the type of recording. Specify whether it’s the original version—most cases—or live, instrumental, slowed-down, sped-up, remixed versions, etc.
- If the recording contains explicit content, this must be indicated at this stage.
- Finally, you must specify whether the recording is performed by a group.
The Alias section of the title is optional and should only be used if the piece is also known by another name. This section isn’t necessarily useful at the time of original entry but could be applied to a song whose original title has been popularized. If so, this alias could be added here to facilitate its later discovery..
3 – Add the artwork associated with the sound recording
This section is very important because it will allow us to complete all the metadata for the recording by linking it to the work’s credits. This is one of the keys to resolving one of the main current metadata challenges.
First, if your recording is a medley of several musical works, check the box next to it. You can then add several works along with their associated timings.
To add a work, click on  on the right. In the search window, begin typing the name of the work. If the name of the work appears, select it.
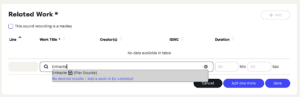
If the work does not appear, several scenarios are possible:
- If you are the songwriter and/or publisher
- Make sure you have registered your work with SOCAN and imported your SOCAN catalogue.
- If you have already declared your works and imported your SOCAN catalogue
- Ensure that no work was incomplete or not yet validated. For example, if the SOCAN code begins with an A, the work is still being processed and will not be added. You will then need to re-import the catalogue once processing is complete.
- If your application is complete and it still doesn’t appear, contact the MetaMusic team for assistance.
- If you are not the songwriter but it is your local collaborators:
- Invite them to add their catalogue containing the works you wish to document, explaining the process and the benefits for songwriters. If necessary, put them in touch with us.
- Once their catalog has been added, you will then be able to associate the correct works with the correct recordings.
- If the work you are recording is a cover or an interpretation of a work by an artist who is not on MetaMusic, is foreign, unreachable, etc:
- We are developing a simplified system for integrating credits associated with re-releases. In the meantime, you can contact us so we can do it manually. Please have as much information as possible about the work in question.:
- Title
- If you have ISWC (ideally) and/or songwriter credits
- An artist (label, country, year, etc.) and an ISRC (if available)
- For some works, the answer is simple, but it’s not always so obvious. In addition to relying on professional data tools, MetaMusic collaborates with SOCAN to validate work credits and ensure that the creators of the works you perform are correctly identified..
- We are developing a simplified system for integrating credits associated with re-releases. In the meantime, you can contact us so we can do it manually. Please have as much information as possible about the work in question.:
4 – If it’s a Group that made the recording, add its name
Click on and type the name into the search bar and select it when it appears.
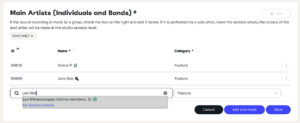
If all the artists are Artisti members and have logged in to MetaMusic, the group should be listed. If the group name does not appear, several scenarios are possible.:
- Artists who are Artisti members are not yet in MetaMusic: depending on your role, you can contact them, or even create their account. Read our article on the subject.
- If the connection is established with Artisti but the group does not appear, and the catalog has already been declared, contact us to resolve the issue. Otherwise, you can create it. Consult our tutorials on creating groups if needed.
- Artists are in MetaMusic, but not Artisti members: there’s a good chance they haven’t created their group yet. You can guide them to this tutorial on group management if needed.
5 – Add the first maker(s) of the sound recording
Here, we are adding the maker in the sense of the production and ownership of the master rights. This concept remains a frequently debated topic, but it is important to remember that the producer credits will be added later. Obviously, if a producer is also among the makers and is a rights holder, they must be added to this section!
Therefore, if you created the sound recording as the producer and you are the only one, this section is complete!
If you need to add another maker or created the recording under a different role, you must add the actual maker of the sound recording by clicking on and by searching for the name in the search bar.
If it doesn’t appear, you can invite it directly from MetaMusic by selecting Send an Invitation in the results bar.
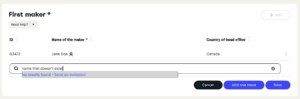
A pop-up window will allow you to invite the co-maker who is not already registered in MetaMusic. Important: You will then need their email address.
6 – Add the recording sessions
Every audio recording comes with a default empty recording session. You can use this blank session by clicking the iconby selecting Edit or Delete. Each session can be modified in the same way.
You can also start a new session by clicking on the icon on the right.
For a new session or editing an existing one, you will be taken to a new window where you can add session details (studio name, date), performers, and technical contributors.
1 – In this new window, click the button to add the details.
- In the search bar, search for the name of the studio..
- If it appears, select it.
- If it’s not there, see the note that follows immediately after.
- Add the start and end dates of the recording. Only the year is required.
2 – Next, add the Performing Artists
Click on then type the artist’s name. When their name appears, select it.
Next, select its status:
- Featured artist if they are the main artist or a member of the featured band
- Non-Featured if they are a backing musician
- Featuring if the artist makes a guest appearance in the piece, the equivalent of a featured artist. The guest artist’s name will appear as such under the main artists of the piece
If the artists you are looking for are not in MetaMusic, you can invite them by selecting:
Send an invitation.  You will need their email address. If you have multiple collaborators to invite or create, see our article on the subject.
For each artist, you can then add the instruments played during that specific session. Click on  to open a pop-up window.

Firstly, click on Add then open the drop-down menu to choose an instrument. By typing the first letter of the instrument you’re looking for, you’ll be taken to that letter. Repeat this process for each instrument you want to add. You can add details such as brands, models, or other information you deem relevant. When all the artist’s instruments have been added, click Save.
3 – Next, add the technical contributors to the studio session
To add the production team and other technical contributors to this studio session, first click on then type the name of the contributor you’re looking for. As soon as it appears, select their name. You can then add their role in the studio.
If the contributor is unavailable, you can invite them directly at this stage. You will need their email address. If you have multiple collaborators to invite or create, see our article on the subject.
When your session is complete, click on  or
or  .
.
If you need to add more sessions, repeat the same process.
Below the recording sessions section, you will find a read-only section that lists all the performers present in all the recording sessions documented above. This will allow you to verify all the performers and the number of sessions in which they appear. If a performer is missing, you must add them to an existing session or create a new session as needed.

This section is for reference only. Since it’s possible to add multiple recording sessions, this allows you to quickly view the list without having to consult each individual session.
7 – Add the arrangers
If arrangements were made during the recording sessions, you can add them at this stage. These are arrangement credits, slightly different from those at the work level, which are declared to SOCAN and are an integral part of the work credits you previously associated with the recording. These are arrangement credits that you might want to assign to a studio contributor such as the producer, a performer, or someone else. This role must have been added to the profile of the contributor you wish to add; otherwise, you will need to invite them as with the other sections (make sure you have everyone’s email addresses)..
To do so, click on then search for and select the name of the desired contributor. Next, add which arrangements are involved (vocals or music). If it’s both vocal and musical arrangements, repeat the exercise. Do the same for all contributors, if applicable..
8 – Add the mixing sessions
This section works in the same way as the studio sessions seen earlier. By clicking on A new window will open. Then, add (studio name, date – only the year is required) by clicking on.
In the second section, add the technicians responsible for the mix by clicking on and invite him if he is not already present.
Once the session is complete, click on or to return to the sound recording.
9 – Add the lyrics and languages
You can add lyrics to an audio recording in two ways. You can:
- Copy the lyrics of the associated work
- If you have associated a work with your audio recording and that work contains lyrics, you will have the opportunity to copy them directly from the work. To do so, click on
 and on if you wish to adjust them (for example if you have added elements such as additional chants, “yeah,” or other text adaptation exercises such as feminizing or masculinizing a text such as in French, for example.
 - If a work is associated but the lyrics are not added, you will either need to do it manually (see below) or add them to the work’s record if you are the songwriter or publisher. Otherwise, you can also invite the publisher/creator to do it. If the lyrics were previously added to Evangeline, a solution is being developed to link lyrics to works between the two systems. For works that have not been added to Evangeline, MetaMusic is the best option.
- If you have associated a work with your audio recording and that work contains lyrics, you will have the opportunity to copy them directly from the work. To do so, click on
- Add the lyrics manually
- If no work has been added or if it does not contain lyrics, you can add them manually by clicking on and on
 .
.
- If no work has been added or if it does not contain lyrics, you can add them manually by clicking on
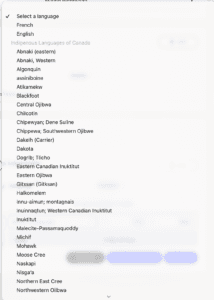
To add languages, you must specify each language used and its timing. To simplify the exercise, calculate the percentage of dialogue and divide the time according to each language. To do this:
- Click on then select the language from the drop-down menu. Next, enter the minutes and seconds for each language in the appropriate fields.
MetaMusic allows for the documentation of French and English, as well as most major languages. Our tool also includes several Indigenous languages that have been identified and integrated into the system. This list is subject to change, and MetaMusic aims to enable Indigenous creators to document these languages within our system. This will also allow MetaMusic to facilitate the integration of these languages into DDEX choreographies, making them universally available. If you think our list needs improvement or modification, please contact us to discuss it and make MetaMusic a tool adapted to your needs.
10 – Add the public funding body or bodies (optional)
If you received public funding for the production or promotion of your sound recording, you can indicate it in this section. This is currently an optional section, but MétaMusique is in discussions with certain public organizations to promote better integration with them. Ultimately, MétaMusique could serve as a tool to facilitate accountability or ensure visibility of public support. Currently, a list has been added, but to add new ones that are missing, contact MetaMusic!
To add a funding organization, click on then type the name of the organization to select it, and then save.
11 – Add the genres and tags
This section is optional and does not directly feed content to the platforms, as MetaMusic does not yet do so directly. However, these two sections (tags and genres) will help you with your marketing activities, SEO on your own platforms, Bandcamp pages, YouTube videos, press releases, radio tracking, etc. The bonus is that you will be using controlled vocabulary lists taken directly from the platforms themselves. Keep in mind, however, that regardless of what we provide them, the platforms ultimately do as they please.
This is precisely why most local artists are identified as “Quebec Indie” on Spotify, or with generic terms like “Quebec Rock,” without any connection to the tags associated with potentially similar international artists. This contributes to an echo chamber that only reaches insiders and die-hard fans of the local scene, without the ability to stand out in the age of algorithms. This section should therefore be viewed as a collection of potential keywords that you can use outside of these platforms to better document your music and potentially impact your SEO.
- Good to know:
- There is no obligation to complete this section in detail, but we recommend reviewing it to assess the available genre options and lists, and to identify the sources/platforms most relevant to your situation! Upon publication, all genres associated with the recordings it contains will be automatically compiled.
- If you have documented a sound recording with multiple genre lists, this section can be reused in its entirety in another recording. Similarly, if you duplicate a sound recording, this section will be among those duplicated.
- You can add multiple tags from the same source, but using too many tags/genres is generally unnecessary and counterproductive, resembling spam or keyword stuffing. Select and add only genres and tags that are consistent with your music and will add value for music lovers, journalists, etc.
This section is thus presented in 2 parts:
- Lists of genres from multiple platforms:
- Amazon Music
- Apple Music
- AWA
- Beatport
- CRTC
- General Distribution (basic distribution list)
- Distrokid
- Gracenote
- Medianet
- Traxsource
- Tunecore
- Youtube Music
- 7 Digital
- Other platforms such as Deezer and Qobuz will be added soon
- A list of over 6000 tags from Spotify, as compiled by Everynoise.com
- To add genres:
- Start by selecting a basic genre from the drop-down menu, for which you have 3 choices.
 :
:
- Classic
- Jazz
- Pop/Country for all the rest
- The formula is designed to group all genres of “popular” music that are neither Jazz nor Classical. In the next step, you will simply have the filtered genres..
- Once you have selected this first choice, click on
- Select a source from the list
- Then select a main genre from this list and, if applicable, a subgenre from the drop-down menu.
- You can then select new ones by pressing Add One More or Save when you’re finished

- Start by selecting a basic genre from the drop-down menu, for which you have 3 choices.
- To add tags:
- Firstly, click on
- In the search bar, start typing to see a selection appear
- Select the appropriate tag
- You can then select new ones by pressing Add one more or Save when you’re finished
- Firstly, click on
- To copy tags/genres from another sound recording:
- If you have already completed a full section in another record, click on

- A window will then appear. Search for the desired recording and the selected recording genres will be displayed.
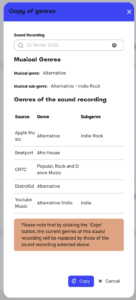
- If the choice is correct, click on Copy.
- The same procedure applies to the Genres and Tags section.
- If you have already completed a full section in another record, click on
You have now documented a complete sound recording. Remember that you can use a complete sound recording as the basis for a new sound recording. You simply need to duplicate it.
And Now?
Have you completed all the audio recordings for your release (album, EP, single)? You can now document your release. Don’t worry, the essentials have already been documented in this section, and the release will allow you to link all the credits for each track to the release! Then, you can submit declarations to collecting societies and export your metadata.